When I was growing up there was only one Christmas decoration that we put up outside of our house. We had a set of red plastic bells that plugged into an electrical outlet behind our front porch light. There was a clear twinkle bulb inside each bell and at night when we turned on the porch light they would twinkle and play music! I can remember hearing them from inside the house...and listening for them when I walked up the driveway outside. To this day I remember those red bells every time Christmas time comes around.
So for my December tag I recreated those red bells. I pretty much followed Tim's steps to create the tag. The bells and bow were colored with alcohol inks. I cut the bottom section of one bell away to create the front piece. The silver bead was aged with a combination of slate and snow cap alcohol ink. I also dabbed the bells with the same combination to give them some imperfections. I cut through the score lines on the bow and wove a wood skewer between the sections to hold them in place while I heated and shaped it. I used a different sentiment and finished the tag off with a piece of tarnished tinsel garland!
I hope everyone had a wonderful holiday and I wish you all a happy, healthy and prosperous New Year!
Sunday, December 29, 2013

Wednesday, October 30, 2013
12 Tags of 2013 - October
I finally took the time to participate in this month's 12 Tags of 2013! I've only made one other tag this year. Since I love Halloween I couldn't pass up making one for this theme. As a matter of fact...I made three! The first and second followed along with Tim's techniques and design. The distress paint colors that he used were fabulous!
I also love the larger tags so I used one of those to create the third tag. I added the apothecary bottles at the bottom which I cut from plastic packaging, colored with alcohol inks and then a layer of frosted film. Three tags means I have some to share so I gave the first one below to a friend!


I also love the larger tags so I used one of those to create the third tag. I added the apothecary bottles at the bottom which I cut from plastic packaging, colored with alcohol inks and then a layer of frosted film. Three tags means I have some to share so I gave the first one below to a friend!


Thanks so much for stopping to take a look! Have a great day!
Tuesday, October 8, 2013
Hello Again!
I hope that all is well with all of you! It's been a long time since I've posted. Time just seems to slip away and I haven't quite figured out where it goes yet! I did a much needed clean-out of my craft room. Donated bags and bags of goods and supplies to schools/churches and I still have way too much stuff. But, like everything else, it's a work in progress. I'm also doing a little remodeling...not built-in (I wish!)...but my brother-in-law helped me put together a new work table and I'm adding some bookcases from Ikea for storage. I'll share photos once it all comes together but right now things are scattered about the room and the house.
In the midst of it all I managed to create this Apothecary Tag Book which I'll be teaching this Saturday, October 12, from 10am-2pm at Whim So Doodle in St. Petersburg, FL.


We'll be using some of the new Tim Holtz Halloween stamp sets including The Chemist and the new Halloween Blueprints. The tags will cover techniques from both of Tim's Compendium of Curiosities books. I believe there are still a few spots left in the class so if you live in the area I'd love to meet you!
Wish me luck as this is my first foray into teaching and I'm getting a little nervous about the whole thing. As long as everyone has fun and learns something I'll consider it a success!!
Wednesday, July 3, 2013
Frilly and Funkie - Get Your Wendy On!
Hello and welcome to another fabulous Frilly and Funkie challenge! In case you haven't noticed Linda has added some fabulous Wendy Vecchi Studio 490 merchandise to her shop! There are stencils, stamps, embossing paste and those fabulous art parts! So to coincide with the new merchandise the challenge theme this time is "Get Your Wendy On"!
For my piece I made some wall art using Studio 490 art parts and stamps. The face and saying are the first two "Wendy" stamps that I purchased!

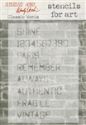
The base is a page from a chipboard book. The background is manila cardstock that I colored with distress stain. I added stenciling with the Classic Words stencil and then I added distress paint and ink using Tim's Mixed Media stamps. Unfortunately that pretty much obliterated the stenciled words from being seen in the photo. I can see them though! The art parts were tinted with distress stain and then overstamped with more patterns from the Mixed Media stamp set.

The "Wendy-Style" grungepaper flowers were made with die cut grungepaper and then colored with distress inks. Then I stamped them and, after drying, I spritzed them with Perfect Pearls before curling the petals and assembling them.

The queen's face is a smaller version of the stamp in the Studio 490 It's Face Art set. I stamped the image on grungepaper multiple times and then colored it with distress ink and distress markers. The layers of the crown were cut from the extra stampings and spritzed with Perfect Pearls for some sparkle and shimmer!
Once all of the pieces were made I glued everything together with Ranger's Glue 'N Seal. The saying was stamped on one of the banners from Tim's Tattered Banner's die and then aged with Vintage Photo and Walnut Stain distress ink. And for the final touch I used some rusted pearly wire for the hanger!
I hope you like my project and that you're inspired to join in our challenge over at Frilly and Funkie! You might win a $25 gift certificate to The Funkie Junkie Boutique! And don't forget to check out all of the other fabulous projects created by my fellow design team members!
Sadly I must also say goodbye as this is my final design team post for Frilly and Funkie. I'd like to thank Linda for giving me this opportunity. I've learned so much over the past six months. I wish I was able to continue with a second DT term but my "other" life is just too demanding right now and something has to give. I also want to extend thanks to my fellow design teammates for their endless support and inspiration! But most of all I want to thank all of the Frilly and Funkie followers for the kind comments and blog love they gave! I hope to come back and visit often!
The following items that I used on my project can be found at The Funkie Junkie Boutique! The boutique offers merchandise at up to a 20% discount from the typical retail price! That's a great deal and you should check it out!!

For my piece I made some wall art using Studio 490 art parts and stamps. The face and saying are the first two "Wendy" stamps that I purchased!

The base is a page from a chipboard book. The background is manila cardstock that I colored with distress stain. I added stenciling with the Classic Words stencil and then I added distress paint and ink using Tim's Mixed Media stamps. Unfortunately that pretty much obliterated the stenciled words from being seen in the photo. I can see them though! The art parts were tinted with distress stain and then overstamped with more patterns from the Mixed Media stamp set.

The "Wendy-Style" grungepaper flowers were made with die cut grungepaper and then colored with distress inks. Then I stamped them and, after drying, I spritzed them with Perfect Pearls before curling the petals and assembling them.

The queen's face is a smaller version of the stamp in the Studio 490 It's Face Art set. I stamped the image on grungepaper multiple times and then colored it with distress ink and distress markers. The layers of the crown were cut from the extra stampings and spritzed with Perfect Pearls for some sparkle and shimmer!
Once all of the pieces were made I glued everything together with Ranger's Glue 'N Seal. The saying was stamped on one of the banners from Tim's Tattered Banner's die and then aged with Vintage Photo and Walnut Stain distress ink. And for the final touch I used some rusted pearly wire for the hanger!
I hope you like my project and that you're inspired to join in our challenge over at Frilly and Funkie! You might win a $25 gift certificate to The Funkie Junkie Boutique! And don't forget to check out all of the other fabulous projects created by my fellow design team members!
Sadly I must also say goodbye as this is my final design team post for Frilly and Funkie. I'd like to thank Linda for giving me this opportunity. I've learned so much over the past six months. I wish I was able to continue with a second DT term but my "other" life is just too demanding right now and something has to give. I also want to extend thanks to my fellow design teammates for their endless support and inspiration! But most of all I want to thank all of the Frilly and Funkie followers for the kind comments and blog love they gave! I hope to come back and visit often!
The following items that I used on my project can be found at The Funkie Junkie Boutique! The boutique offers merchandise at up to a 20% discount from the typical retail price! That's a great deal and you should check it out!!
 |  |  |  | |
 |  |  |  | |
 |  |  |  |  |
 |  |  |  |  |
 |  |  |  |  |
 |  |  |  |  |
 |
Wednesday, June 19, 2013
Frilly and Funkie - Birds & Nests
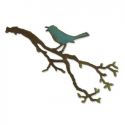
Welcome to another Frilly and Funkie challenge! This week the theme is Birds and Nests! I have always been fascinated by birds and have had a number of varieties as pets in past years. I was even blessed with nestlings from a pair of lovebirds and a pair of Lady Gouldian finches. That was exciting, and messy, but moreso exciting! Nowadays I prefer to observe birds in nature instead of in cages. My current fascination is a pair of Carolina Wrens that frequent my front patio! They are the cutest!
So for my project I decided to make a bird journal. I started with a chipboard album that I covered with an assortment of papers from my stash (Pink Paislee, Glitz and Bo Bunny). On the cover I used Tim's Sizzix Bird Branch die, cut from grungeboard and colored with distress ink, as well as a small bird's nest embellishment. Underneath the die cut is a distressed image from the Artistic Outpost's Birds of a Feather stamp set. The journal label was die cut with Tim's Movers and Shapers mini labels die.


 I hope you like my project and that you're inspired to join in our challenge over at Frilly and Funkie! You might win a $25 gift certificate to The Funkie Junkie Boutique! And don't forget to check out all of the other fabulous projects created by my fellow design team members!
The following items that I used on my project can be found at The Funkie Junkie Boutique! The boutique offers merchandise at up to a 20% discount from the typical retail price! That's a great deal and you should check it out!!
So for my project I decided to make a bird journal. I started with a chipboard album that I covered with an assortment of papers from my stash (Pink Paislee, Glitz and Bo Bunny). On the cover I used Tim's Sizzix Bird Branch die, cut from grungeboard and colored with distress ink, as well as a small bird's nest embellishment. Underneath the die cut is a distressed image from the Artistic Outpost's Birds of a Feather stamp set. The journal label was die cut with Tim's Movers and Shapers mini labels die.

On the inside journal pages I added glassine envelopes that hold ATC sized cards. On the backs of the cards I stamped lines for journaling about bird sightings! Some of the envelopes also hold die cut flowers, birds and other ephemera. The pages were also randomly stamped with various bird-related images. On each page space has been left for photographs, or drawings, of birds.


Journals of this type are a work-in-progress for a long time with me. I'll sit it aside and at some point when I'm working on another project I'll get an idea to add something . Hopefully, I'll be able to share the finished journal with you in the near future!
The following items that I used on my project can be found at The Funkie Junkie Boutique! The boutique offers merchandise at up to a 20% discount from the typical retail price! That's a great deal and you should check it out!!
 | | |  | |
 |  |  | |  |
 | |  | |  |
| | |  |  | |
| |  |  |  |
Subscribe to:
Posts (Atom)